 |
|
|
|
MONDAY MORNING MESSENGER
|
 The online newsletter come straight from the computer of Michael Leavitt and it is prepared especially for serious home inspectors around the globe. We hope that you enjoy today's issue and we also encourage you to share the issue with your fellow home inspectors. We also encourage you to become a full MMM subscriber. The online newsletter come straight from the computer of Michael Leavitt and it is prepared especially for serious home inspectors around the globe. We hope that you enjoy today's issue and we also encourage you to share the issue with your fellow home inspectors. We also encourage you to become a full MMM subscriber.
|
 June 21, 19991 June 21, 19991 |
IT'S A GREAT DAY...
It's a great day here in Orem, Utah.I am back from one of the busiest week's of my life. Vacations are a lot of work. Vacations with four kids complicates the trip itinerary even more. Having an 18 month old who just wants to cry whenever he is placed in his car seat makes things almost unbearable. Time has flown by and the hectic return to work schedule has not allowed a moment for capturing the wealth of thoughts, information and learning experiences that I encountered last week in Northern Washington. That will have to wait for another week. Today's MMM revisits a previously discussed topic from the first year's MMM issues in April of 1998. The information is still timely and I believe of great value to us as Home Inspectors.
|
 ONSITE COMPUTER USE ONSITE COMPUTER USE |
|
It seems that many of you are still contemplating the conversion to computerization. I regularly get calls from inspectors wanting to know how to build a tripod setup for their new laptop...... Let's flashback to my original explanation of the process.
Computers are definitely t he wave of the future for our industry. Using them is very efficient and cuts down on the time spent on-site, but how do you use one effectively without damaging the unit. An Inspector friend of mine in Salt Lake City shows up on site and sets up his computer on the kitchen table. He will evaluate an area or component and then return to the kitchen table to input the data. He must get tired returning to the unit 50 times. I guess he uses the countertop inside of vacant homes (I never asked). he wave of the future for our industry. Using them is very efficient and cuts down on the time spent on-site, but how do you use one effectively without damaging the unit. An Inspector friend of mine in Salt Lake City shows up on site and sets up his computer on the kitchen table. He will evaluate an area or component and then return to the kitchen table to input the data. He must get tired returning to the unit 50 times. I guess he uses the countertop inside of vacant homes (I never asked).
 Back in December of 1996, I had just loaded my 3-D Inspection system software and my AII™ style form into a borrowed laptop computer and I was ready to inspect. I took along my notebook with a blank checklist report just in case. The first inspection with a borrowed laptop was quite an adventure. Back in December of 1996, I had just loaded my 3-D Inspection system software and my AII™ style form into a borrowed laptop computer and I was ready to inspect. I took along my notebook with a blank checklist report just in case. The first inspection with a borrowed laptop was quite an adventure.
Right off the bat I was faced with a huge challenge........ When you do the exterior of the home, what do you do with the machine??? You get tired of carrying it around. You can't set it anywhere with a great deal of comfort. December is snow time in Utah which only exacerbated the situation.
Carrying the unit with gloves on didn't work very well either. I tried it. Even fingerless gloves were a pain to try and type in the information. Also, seeing the screen in the sunlight was near impossible. I tried that too. Setting the laptop down on the ground was equally scary. It seems that dogs and little kids are attracted to hi-tech equipment. The garage wasn't any easier. Most garages in Utah don't have a flat spot where you can lay anything down. They are cluttered beyond belief. (This is probably not just a Utah thing--I would guess it is the same all over America!) The kitchen countertop was ideal though, because the height was right and the surface was flat and secure. The only challenge in the kitchen is the housewife who is wanting to prepare food and/or clean-up.
 The nightmare continued with the bedrooms. Each time I set the unit down, I was preoccupied with it's safety. Beds are insecure at best. They also provide a lousy low surface upon which to type in information. Bathrooms are a little better, although some of the counters and bathrooms with pedestal sinks make the setting down of the computer nearly impossible. The idea is to be "Hands Free" instead of "Hands Full". All throughout the inspection I was questioning the feasibility of computers, while the creative side of my brain was busy inventing. The nightmare continued with the bedrooms. Each time I set the unit down, I was preoccupied with it's safety. Beds are insecure at best. They also provide a lousy low surface upon which to type in information. Bathrooms are a little better, although some of the counters and bathrooms with pedestal sinks make the setting down of the computer nearly impossible. The idea is to be "Hands Free" instead of "Hands Full". All throughout the inspection I was questioning the feasibility of computers, while the creative side of my brain was busy inventing.
The worst area of the home was the Service Room. This is where a great deal of the report is composed, yet there is rarely a surface to set the unit. There is something awful about setting a computer on the ground and kneeling on the concrete to type in the information. By the end of that first inspection I had resolved what I was going to do. I had a dream...... I was determined to mount my laptop computer upon a lightweight camera tripod.
|
 MOUNTING A UNIT ON A TRIPOD MOUNTING A UNIT ON A TRIPOD |
|
I had recently installed a metal closet organizer kit into my kid's closet and I had leftover shelving. Turns out that if you turn it over and cut it down with a hacksaw, it makes a perfect shelf.  I trimmed it 11" wide and 6 1/2" tall and it already had the 1 1/2" high lip on it. It was plastic coated, and all I had to do was put the rubber end caps on that fit over 1/4" rod. I trimmed it 11" wide and 6 1/2" tall and it already had the 1 1/2" high lip on it. It was plastic coated, and all I had to do was put the rubber end caps on that fit over 1/4" rod. You can buy the shelving in separate pieces w/o purchasing the entire kit. You can buy the shelving in separate pieces w/o purchasing the entire kit.
Installing this shelf onto the tripod was a little trickier. Tripods have a built-in bolt to attach cameras onto. They are a standard 1/4" course thread. I then took a paint stir stick and trimmed it down to 10". This was the perfect thickness and width to fit in between the framing cross supports of the tray.
I purchased a special attachment that is threaded and designed to press into wood and allow you to use a securing bolt. I don't know what they are called, but you drill a 1/4" hole in the wood and from the reverse side this unit slides into the hole while at the same time driving spikes into the surrounding wood from it's 1/2" square head.
I next laid the wood strip onto the shelf, and used the camera mounting bolt to tighten the strip of wood and tray securely to the top of the tripod....... What a great idea!!!
NOTE: The next picture clearly shows the black velcro covered wood strip fitting between the metal support bars.
|
 HOW TO ATTACH THE LAPTOP HOW TO ATTACH THE LAPTOP |
|
Now I had a secure shelf in which to place my tripod. From this base I made several other improvements. I purchased velcro with the strong self-stick backing and applied it to the stirrer stick.  I purchased the heavy duty velcro used for upholstery work, and not the lightweight light sewing type. The adhesive is much stronger. I considered placing the other half of the strip directly onto the corresponding spot on the laptop. This would work well. I purchased the heavy duty velcro used for upholstery work, and not the lightweight light sewing type. The adhesive is much stronger. I considered placing the other half of the strip directly onto the corresponding spot on the laptop. This would work well.
In our climate we have rain, snow and dust so I opted to make a custom vinyl and plastic protective cover for my laptop. I do a lot of upholstery and sewing, so it was not a big challenge. This may prove to be a struggle for you, however. I have found the case to be invaluable in protecting my unit. I then attached the velcro to the case, instead of the unit.
|
 HOW TO ATTACH THE A/C ADAPTER HOW TO ATTACH THE A/C ADAPTER |
The final improvement was the addition of a removable bag on the back part of the shelf to hold my A/C adaptor. The battery life on my unit is way too short, so I have developed the habit of carrying the unit into a room and quickly plugging it  into an open outlet. This allows for all day use, and it is really quite easy to do. When I enter a room that isn't convenient, I don't bother and I run off the battery......... This will always be an issue with laptops until a battery breakthrough occurs. into an open outlet. This allows for all day use, and it is really quite easy to do. When I enter a room that isn't convenient, I don't bother and I run off the battery......... This will always be an issue with laptops until a battery breakthrough occurs.
PLEASE NOTE: When I do a home where the power is shut off, my battery life will get me through the inspection, but I have an A/C converter for my van just in case.
I quickly tired of having this long A/C cord to wrap around the tripod as I carried it around, so I went back to the hardware store and came up with another idea. I found a replacement female extension cord end and attached it to my cord carrying bag. When I unplug the cord from the wall I just plug it into the female plug on the bag. This keeps it from dragging on the floor and works very well.
|
 MODIFYING THE TRIPOD FOOTPRINT MODIFYING THE TRIPOD FOOTPRINT |
| The tripod I use had a very wide footprint, and it irritated
me as I hit furniture or walls. I looked at the design and customized
it so that the legs do not open as wide. Each tripod is different,
so I can't give you any help on your modification. The narrower
footprint does make the stand a little less secure, but I have
yet to have it fall over because of the narrow footprint. I have
had near misses with kids, dogs, and inquisitive types who open
doors where the unit is placed.
|
 TRANSPORTING THE LAPTOP TRANSPORTING THE LAPTOP |
My one casualty was in transporting my computer from my home to the van. It slipped out of my hand and onto my foot and then cracking could be heard as it hit the ground. It took over six months to get the $762 display screen. Yes, I had to immediately buy another matching unit. I now have a policy where I never carry the unit unless it is securely inside the mini-duffle bag that also contains the inspection info notebook and other items. This has eliminated the risk of dropping the unit.
EDITOR’S NOTE: I shattered another screen a couple of years later that also ran $800 and took the better part of 6 months to ship from Japan.
|
 WHICH LAPTOP SHOULD I BUY? WHICH LAPTOP SHOULD I BUY? |
|
1999 RECOMMENDATION - As stated in my MMM Service Contract... Our editor is not allowed to answer the question "Would you buy this laptop if you were me?" and cannot be held responsible for the whining Buyer's remorse plea of "But for your MMM information I would not have purchased this model laptop." The purchase of a laptop is a very individual decision, and the MMM is designed to be a useful tool to aid you in your decision. There are many factors that must be considered in the purchase of a laptop that go way beyond the scope of this edition. For example, if you were to purchase a 100 megahertz laptop today and find out next month that Michael Leavitt was able to use a voice activated software to input the data, but it would only work on a 200 megahertz machine and your new machine was only 133 megahertz...... So be it!!!! No whining allowed!!! (This, by the way, is probably going to happen.)
When asked which laptop an Inspector should buy...... I tend to view my laptops as disposable data capture devices and therefore want them to be the cheapest unit that will perform the job. Sure, I could spend $3,000-4,000 on a top of the line lightening fast unit with all of the bells and whistles, but they break just as easy as the $1,200 units. To run the software I use it takes a minimum of 100 megahertz, the ability to run Windows 95 and about 24 mg of ram. Anything more is just a luxury (except for maybe more ram).
My home base computer is a different issue. I don't view my laptop as a home base replacement. I do my reports on the laptop and that is it. My graphics, advertising, E-mailing, internet and Monday Morning Marketers are all done on my home base unit. I think that it would be a mistake to expect the laptop to do it all. It is kind of like the "Put all of your Easter eggs into one basket" philosophy. If the laptop went down.... you would be in a world of hurt.
|
 PARTING SHOT PARTING SHOT |
| I wish all of you good luck in mounting your unit to a tripod. It is a relatively easy process. It looks professional, and it frees up your hands. I don't even know how I used to do inspections lugging around a notebook or a clipboard. The tripod has really freed me up during my inspection, it has greatly reduced my inspecting time, and it helps me create an extremely professional report.
I found that for about $40 you can buy a better tripod that has controls for the width of the leg spread that I mentioned above that I had to modify on my original unit. The more expensive tripods also are more stable and include features such as a quick disconnect for the tray removal. This comes in handy when breaking down the setup for travel.
As to my recommendation on laptops I still recommend a more inexpensive unit with a good home base unit to fall back upon. I would also greatly upgrade the amount of ram to 64 meg or more. Softwares are also more user friendly, although the learning curves will never be removed.
EDITOR’S NOTE: Nowadays I use a Fujitsu P1115 ultraportable pen driven laptop. It is available directly from Fujitsu and runs Windows XP and has an extended battery life of about 6 hours. The unit weighs 2.5 lbs. and I have a wearable harness that I invented. It has eliminated the need for the tripod, but before I invented the harness I was using it daily on a tripod setup just like I have described above.
|
 QUOTABLE QUOTE QUOTABLE QUOTE |
|
"Whether you think you can or you can't - you're right." Henry Ford.
|
 THERMAL IMAGE FORM SETS THERMAL IMAGE FORM SETS |
 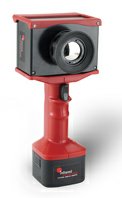 I really enjoyed unveiling the Thermal Image Scan form sets to the participants at Inspection World. It was confirmed there that nothing like them is to be found in the marketplace. I look forward to having many sales from inspectors looking to make the leap into this added service arena. I really enjoyed unveiling the Thermal Image Scan form sets to the participants at Inspection World. It was confirmed there that nothing like them is to be found in the marketplace. I look forward to having many sales from inspectors looking to make the leap into this added service arena.
If you currently use the popular 3D Inspection System reporting software then all you need to purchase is the form set package. If you do not have 3D then you have two viable options....
|
|
|
 |
|
REPORT - COVER
|
REPORT - BODY
|
SAMPLE CONTRACT |
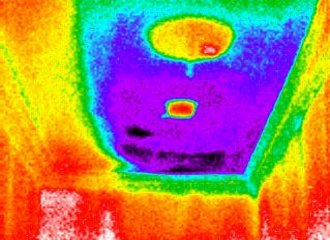
WHAT IS INCLUDED? - The Thermal Image Scan report form set package includes:
 |
|
ROLL OVER IMAGE WITH MOUSE
|
- Reporting Format - Includes sections on interior and exterior wall scans, electrical system scans, ......
- Sample Contract - This includes a sample contract that helps to define the scope ...
- Residential Marketing Plan - This is what is repeatedly missing with thermography trainings today. Even after investing $1,500 to become a level 1...
CLICK HERE FOR MORE INFORMATION ON MY THERMAL IMAGE SCAN FORM SET
 |
|
CLICK TO CHECK OUT MY NEW 3D SHOPPING CART AND SAVE AN IMMEDIATE 3% OFF THE 3D LIST PRICES.
|
BACK TO THE TOP
|
|
|
|

HAVE A GREAT WEEK!
|
 |
- Copyright; 2006
- Michael Leavitt & Co
- 1145 N. Main St.
- Orem, UT 84057
- 801-225-8020
|
|
|